Lofting & Bunking Instructions

Maximize the space in your room!

Use our instructions to loft or bunk your beds. Two people are required to complete this safely and correctly. If you are unable to find a partner or need help, please contact Facilities Operations to enter a work order.

Note that due to large volume of work orders during move-in time, the request may take up to three business days.

Equipment

You will need:

  • bed ends
  • a stabilizer bar
  • bed spring(s)
  • bunking pins

All necessary pieces for bed frames are provided in most areas of campus (but not all areas). In accordance with the housing contract, please remember that University furniture must remain in your room.

Bed End (Figure A)

bed end

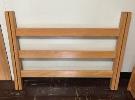
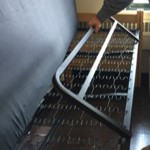
Bed Springs (Figure B)
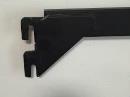
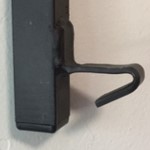
Bed-Spring

J-Hook (Figure C)

J-Hook

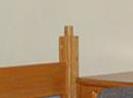
Metal Pin (Figure D)

Integrated Pin (Figure E)

Integrated-pin

Stabilizer Bar (Figure F)
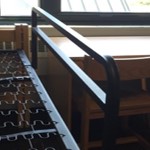
stabilizer-bar

Instructions

Individual Bed-Assembly

  • With your bedspring (figure B) J-Hook (figure C) facing downward on the ground between you,  you and your partner stand on opposite sides with the bed end (figure A) rungs facing inward
  • Carefully lift the bedspring ends one by one and insert the J-hook at the same height, make sure it is secure

Bunking

  • Complete (2) single bed assemblies with the instructions above
  • Insert the bunking pins (figures D/E) into the top four corner holes of one single bed assembly
  • With your partner, lift the second completed bed assembly on top of the other, making sure the pins are lined up

Lofting

  • With the stabilizer bar on the ground between you, you and your partner stand on opposite sides with the bed end rungs facing inward
    Carefully lift the stabilizer bar end with J-Hook ends one by one and insert at mid height of bottom bed
  • Insert the bunking pins into the top four corners of the bed ends
  • Lift the single completed bed assembly on top of the bed ends and make sure the pins line up

Instructions for Towers Residents

Bunking instructions for Towers are slightly different and their beds will look different from the images on this page. Please review these directions:

One Person Set-Up Instructions

Two Person Set-Up Instructions

The zTrak Bed System from Sauder Education

Safety Rails

Safety Rails are available by request at Facilities Operations.
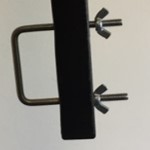
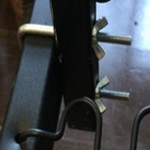
Type A Safety Rail

Style: U-bolt and Wingnut
Locations: Universal to all beds on campus
Attaches to: Encased bedspring frame AND L-Shaped bedspring frame

  1. Make sure you have (1) safety rail, (2) U-bolts, and (4) Wingnuts. Picture shows (1) U-bolt and (2) Wingnuts. You will need two of these setups to complete the installation. Remove the wingnuts and U-bolts from the safety rail
    wingnuts
  2. Pull the mattress off the bed frame. Line up the safety rail on the inside of the bed frame so that the holes on the safety rail are above and below the bed frame outer rail.
    Type-A-Safety-Rail-3    Type-A-Safety-Rail-2
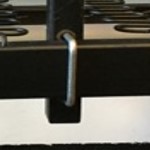
  3. Insert U-bolt(s) around the bed frame and through the safety rail. Tighten wingnuts.
    Type-A-Safety-Rail-4

Type N Safety Rail

Style: Clip-In
Locations: Typically found in Northwood Apartments, Garrigus Suites, Hilltop Apartments, Hilltop Halls, Werth Tower, Charter Oak Apartments, South Campus, and West Campus
Attaches to: ONLY  L-Shaped bedspring frame

  1. Make sure you have (1) safety rail.
    Type-B-Safety-Rail-1
  2. Pull the mattress off the bed frame. Facing the frame hold the safety rail so that the welded clips are towards the bed frame. Tilt the safety rail at a 45 degree angle to slide the clip under the inside of the bed frame.
    Type-B-Safety-Rail-2
  3. Pull safety rail back toward you once the clips are hooked on to the bed frame.
    Type-B-Safety-Rail-3

See Lofting Instructions for printable instructions or to zoom in on pictures.